概要
Mailableクラスを使用して、構造化されたメール送信を行います。
Mailableクラスを作成
【実行内容】
php artisan make:mail クラス名設定
メールを構築し、実際に送信されるメールの内容を定義します。
Laravel 10以前
【ファイル先】App\Mail\※※※※.php
// 渡されたデータをクラス全体で使えるように保存
public function __construct($data)
{
    $this->data = $data;
}

// メールのテンプレートを指定し、データを渡してメールを構築
public function build()
{
    return $this->view(テンプレートを指定)
                ->with(データを渡す);
}
Laravel 11
【ファイル先】App\Mail\※※※※.php
// 渡されたデータをクラス全体で使えるように保存
public function __construct(型ヒント $data)
{
    $this->data = $data;
}

// メールの件名や送信者などの基本情報を設定
public function envelope(): Envelope
{
    return new Envelope(subject: 件名や送信者などの基本情報);
}

// メールの本文テンプレートとデータを定義
public function content(): Content
{
    return new Content(
        view: 'テンプレートを指定',
        with: ['データを渡す']
    );
}

// メールに添付ファイルがある場合に指定
public function attachments(): array
{
    return [];
}
メール送信処理
Mail::to($data->email)->send(new メールクラス($data));例
1.コマンド
各ファイルを作成します。
// order(モデル、シーダー、コントローラー、マイグレーション)作成
php artisan make:model Order -scm

// OrderItem(モデル、マイグレーション)作成
php artisan make:model OrderItem -m

// Mailableクラス作成
php artisan make:mail OrderConfirmation
2.マイグレーション定義
【ファイル先】database/migrations/xxxx_xx_xx_xxxxxx_create_orders_table.php
<?php

use Illuminate\Database\Migrations\Migration;
use Illuminate\Database\Schema\Blueprint;
use Illuminate\Support\Facades\Schema;

/**
 * CreateOrdersTableクラス
 *
 * ordersテーブルのマイグレーション定義
 */
class CreateOrdersTable extends Migration
{
    /**
     * テーブルを作成
     *
     * @return void
     */
    public function up()
    {
        Schema::create('orders', function (Blueprint $table) {
            $table->id(); // プライマリキー
            $table->string('customer_email'); // 顧客メールアドレス
            $table->decimal('total', 10, 2); // 合計金額
            $table->timestamps(); // 作成・更新タイムスタンプ
        });
    }

    /**
     * テーブルを削除
     *
     * @return void
     */
    public function down()
    {
        Schema::dropIfExists('orders');
    }
}
【ファイル先】atabase/migrations/xxxx_xx_xx_xxxxxx_create_order_items_table.php
<?php

use Illuminate\Database\Migrations\Migration;
use Illuminate\Database\Schema\Blueprint;
use Illuminate\Support\Facades\Schema;

/**
 * CreateOrderItemsTableクラス
 *
 * order_itemsテーブルのマイグレーション定義
 */
class CreateOrderItemsTable extends Migration
{
    /**
     * テーブルを作成
     *
     * @return void
     */
    public function up()
    {
        Schema::create('order_items', function (Blueprint $table) {
            $table->id(); // プライマリキー
            $table->foreignId('order_id')->constrained()->onDelete('cascade'); // ordersテーブルとの外部キー制約
            $table->string('product_name'); // 商品名
            $table->integer('quantity'); // 数量
            $table->decimal('price', 10, 2); // 価格
            $table->timestamps(); // 作成・更新タイムスタンプ
        });
    }

    /**
     * テーブルを削除
     *
     * @return void
     */
    public function down()
    {
        Schema::dropIfExists('order_items');
    }
}
3.モデル定義
【ファイル先】app/Models/Order.php
<?php

namespace App\Models;

use Illuminate\Database\Eloquent\Model;

/**
 * Orderクラス
 *
 * ordersテーブルに対応するモデル
 */
class Order extends Model
{
    protected $fillable = ['customer_email', 'total'];

    /**
     * 注文に関連する注文項目を取得
     *
     * @return \Illuminate\Database\Eloquent\Relations\HasMany
     */
    public function items()
    {
        return $this->hasMany(OrderItem::class);
    }
}
【ファイル先】app/Models/OrderItem.php
<?php

namespace App\Models;

use Illuminate\Database\Eloquent\Model;

/**
 * OrderItemクラス
 *
 * order_itemsテーブルに対応するモデル
 */
class OrderItem extends Model
{
    protected $fillable = ['order_id', 'product_name', 'quantity', 'price'];

    /**
     * 注文項目に関連する注文を取得
     *
     * @return \Illuminate\Database\Eloquent\Relations\BelongsTo
     */
    public function order()
    {
        return $this->belongsTo(Order::class);
    }
}
4.シーダー定義
【ファイル先】database/seeders/OrderSeeder.php
<?php

namespace Database\Seeders;

use Illuminate\Database\Seeder;
use App\Models\Order;
use App\Models\OrderItem;

/**
 * OrderSeederクラス
 *
 * テストデータをデータベースに挿入するシーダー
 */
class OrderSeeder extends Seeder
{
    /**
     * シードを実行
     *
     * @return void
     */
    public function run()
    {
        // 注文データを作成
        $order = Order::create([
            'customer_email' => 'tomoji@example.com',
            'total' => 5000.00,
        ]);

        // 注文項目データを作成
        OrderItem::create([
            'order_id' => $order->id,
            'product_name' => 'Product A',
            'quantity' => 1,
            'price' => 2500.00,
        ]);

        OrderItem::create([
            'order_id' => $order->id,
            'product_name' => 'Product B',
            'quantity' => 2,
            'price' => 1250.00,
        ]);
    }
}
5.コントローラー定義
【ファイル先】app/Http/Controllers/OrderController.php
<?php

namespace App\Http\Controllers;

use App\Mail\OrderConfirmation;
use App\Models\Order;
use Illuminate\Support\Facades\Mail;

/**
 * OrderControllerクラス
 *
 * 注文に関する処理を制御
 */
class OrderController extends Controller
{
    /**
     * 注文確認メールを送信
     *
     * @param int $orderId
     * @return \Illuminate\Http\JsonResponse
     */
    public function sendOrderConfirmation($orderId)
    {
        $order = Order::with('items')->findOrFail($orderId);

        // 注文確認メールを送信
        Mail::to($order->customer_email)->send(new OrderConfirmation($order));

        return response()->json(['message' => '注文確認メールが送信されました']);
    }
}
6.Mailableクラス定義
Laravel 10以前
【ファイル先】app/Mail/OrderConfirmation.php
<?php

namespace App\Mail;

use Illuminate\Bus\Queueable;
use Illuminate\Mail\Mailable;
use Illuminate\Queue\SerializesModels;
use App\Models\Order;

/**
 * OrderConfirmationクラス
 *
 * 注文確認メールを構築
 */
class OrderConfirmation extends Mailable
{
    use Queueable, SerializesModels;

    public $order;

    /**
     * 新しいOrderConfirmationインスタンスを作成
     *
     * @param \App\Models\Order $order
     * @return void
     */
    public function __construct($order)
    {
        $this->order = $order;
    }

    /**
     * メールの構築
     *
     * @return $this
     */
    public function build()
    {
        return $this->view('emails.orders.confirmation')
                    ->with(['order' => $this->order]);
    }
}
Laravel 11
【ファイル先】app/Mail/OrderConfirmation.php
namespace App\Mail;

use Illuminate\Bus\Queueable;
use Illuminate\Mail\Mailable;
use Illuminate\Mail\Mailables\Content;
use Illuminate\Mail\Mailables\Envelope;
use Illuminate\Queue\SerializesModels;

/**
 * OrderConfirmationクラス
 *
 * 注文確認メールを構築
 */
class OrderConfirmation extends Mailable
{
    use Queueable, SerializesModels;

    public $order;

    /**
     * 新しいOrderConfirmationインスタンスを作成
     *
     * @param \App\Models\Order $order
     * @return void
     */
    public function __construct($order)
    {
        $this->order = $order;
    }

    /**
     * メールの封筒情報を取得
     *
     * @return \Illuminate\Mail\Mailables\Envelope
     */
    public function envelope(): Envelope
    {
        return new Envelope(
            subject: 'Order Confirmation',
        );
    }

    /**
     * メールのコンテンツを定義
     *
     * @return \Illuminate\Mail\Mailables\Content
     */
    public function content(): Content
    {
        return new Content(
            view: 'emails.orders.confirmation',
            with: ['order' => $this->order]
        );
    }

    /**
     * メールに添付するファイルを取得
     *
     * @return array<int, \Illuminate\Mail\Mailables\Attachment>
     */
    public function attachments(): array
    {
        return [];
    }
}
7.メールテンプレート
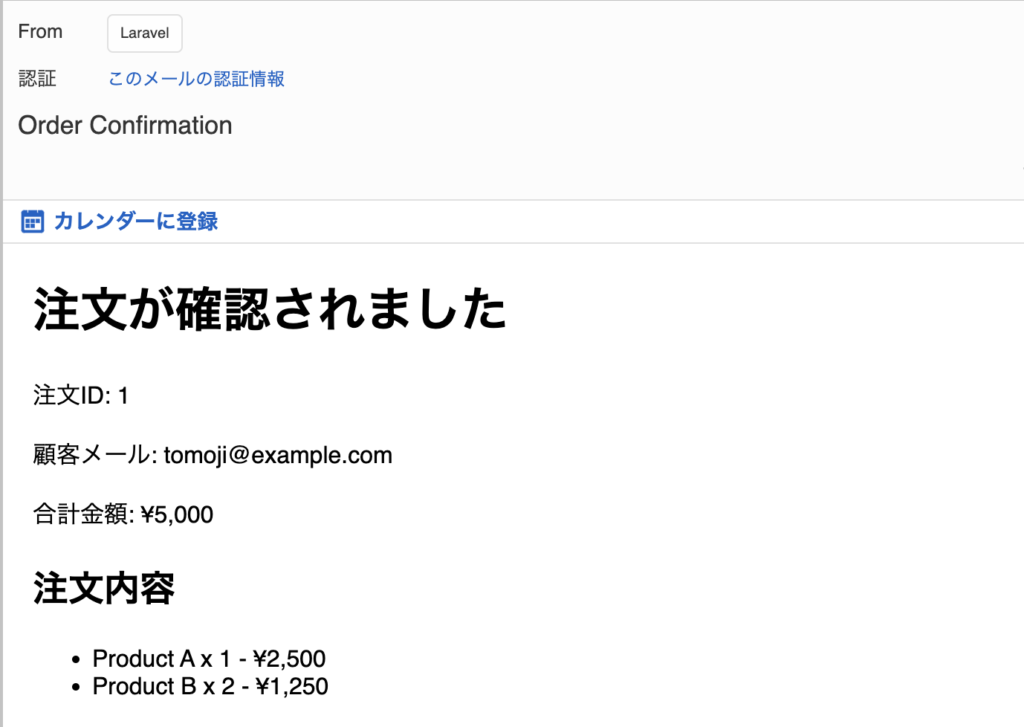
【ファイル先】resources/views/emails/orders/confirmation.blade.php
<h1>注文確認</h1>
<p>注文ID: {{ $order->id }}</p>
<p>合計金額: ¥{{ number_format($order->total, 0) }}</p>

<h2>注文内容</h2>
<ul>
    @foreach($order->items as $item)
        <li>{{ $item->product_name }} x {{ $item->quantity }} - ¥{{ number_format($item->price, 0) }}</li>
    @endforeach
</ul>
8.マイグレーションとシーダー実行
【マイグレーション実行】
php artisan migrateordersが先に実行されないとエラーになる(タイムスタンプを変更し先に実行をコントロール)
php artisan migrate –path=/database/migrations/xxxx_xx_xx_xxxx19_create_orders_table.php
php artisan migrate –path=/database/migrations/xxxx_xx_xx_xxxx20_create_order_items_table.php
【シーダー実行】
// クラス名指定のシーダー
php artisan db:seed --class=OrderSeeder
【DB】
mysql> select * from orders;
+----+----------------------+---------+---------------------+---------------------+
| id | customer_email       | total   | created_at          | updated_at          |
+----+----------------------+---------+---------------------+---------------------+
|  1 | tomoji@example.com   | 5000.00 | 2024-01-01 00:00:01 | 2024-01-01 00:00:01 |
+----+----------------------+---------+---------------------+---------------------+
1 row in set (0.00 sec)

mysql> select * from order_items;
+----+----------+--------------+----------+---------+---------------------+---------------------+
| id | order_id | product_name | quantity | price   | created_at          | updated_at          |
+----+----------+--------------+----------+---------+---------------------+---------------------+
|  1 |        1 | Product A    |        1 | 2500.00 | 2024-01-01 00:00:01 | 2024-01-01 00:00:01 |
|  2 |        1 | Product B    |        2 | 1250.00 | 2024-01-01 00:00:01 | 2024-01-01 00:00:01 |
+----+----------+--------------+----------+---------+---------------------+---------------------+
2 rows in set (0.00 sec)
9.envファイルのメール設定
MAIL_MAILER=smtp                        # メール送信プロトコル
MAIL_HOST=smtp.gmail.com                # SMTPサーバー(Gmailの例)
MAIL_PORT=587                           # SMTPポート番号
MAIL_USERNAME=your_email@gmail.com      # SMTP認証用のメールアドレス
MAIL_PASSWORD=your_email_password       # SMTP認証用のパスワード(またはアプリパスワード)
MAIL_ENCRYPTION=tls                     # 通信の暗号化(Gmailは通常TLS)
MAIL_FROM_ADDRESS=your_email@gmail.com  # 送信元のメールアドレス
MAIL_FROM_NAME="${APP_NAME}"            # 送信元の名前(アプリ名など)
Googleアプリパスワード取得
1.Googleアカウント選択
2.セキュリティ選択
3.2段階認証プロセスを有効化する
4.アプリパスワードを生成する
10.メール送信テスト
【コマンド】
php artisan tinker【Tinker内での実行コード】
> $order = App\Models\Order::find(1);
= App\Models\Order {#5024
    id: 1,
    customer_email: "tomoji@example.com",
    total: "5000.00",
    created_at: "2024-01-01 00:00:01",
    updated_at: "2024-01-01 00:00:01",
  }

> Mail::to('送信したいアドレス')->send(new App\Mail\OrderConfirmation($order));
= Illuminate\Mail\SentMessage {#6060}
11.メールチェック

